Showing posts with label Cricut. Show all posts

Monday, March 23, 2015

Merry Christmas

 Good Morning!

 Today I wanted to share with you all a Christmas Card I made. This Card is 9 by 4 in size which was very different for me to do. I actually think I love the size of the card and plan on making more and also doing other cards of different sizes and shapes!


 The trees are from the Winter Frolic Cricut Cartridge. I had to use a different star than the one on the cart because the explore wasn't cutting the stars on this tree to well.

 The sentiment is done using the explore writing tool.

 I even dug out my knock out punches which I never used and did the stars across the bottom!

 Thanks for stopping by!

Saturday, March 21, 2015

Thank You Cards Cricut

Happy Saturday!
I hope everyone is having a great weekend so far!

Today I wanted to share a couple of Thank You Cards I made.
The butterfly is from the Paper Trimmings Cartrdidge.
And I used the cricut markers to write out the text.

The paper was Close to my Heart. But for the life of me I can not remember what the paper pack name was.

And of course I had to add some glitter!


Thank you for stopping by my blog!

Friday, February 20, 2015

Pebbles Hip Hip Hooray Card

Happy Friday! Today I am sharing with you two cards I made using the bright and cheerful Pebbles Hip Hip Hooray collection!


  For the frame on both cards I used Cricut Design Space and the Artise Cartridge from Close To My Heart. The image used was the note card image.

 The sentiments were stamped in Stampin Up Real Red. And the sentiments are both from Stampin Up Great Greetings Stamp set.


 Thanks for stopping by my blog today. Have a great weekend!!!!!


Friday, January 30, 2015

Using up some of my paper stash

TGIF!!!
Good Morning. I hope everyone is having a great day!

Any fun plans for the weekend? I am working on going through my stash and using up what I have.
I realized I have so much stuff that I never touch. So I am going to challenge myself to use that up as well as use some of those tools I just had to have and never use. LOL.

So today I wanted to share a few cards I made. 


I used Pebbles Hip Hip Hooray paper pack and elements collection.
And cut the the frame using Cricut Design Space, the Explore, the Artise Cartridge, and the note card image.
The sentiment is from The Stamps of Life set pinwheels2stamp.

Thanks for stopping by my blog today:)
I hope everyone has a great weekend! 


Thursday, January 29, 2015

Your A Wheel Friend Card

Good Morning. Today I wanted to share this cute card I made.

I used Pebbles Hip Hip Hooray paper pack and elements collection.
And cut the the frame using Cricut Design Space, the Explore, the Artise Cartridge, and the note card image.
The sentiment is from The Stamps of Life set pinwheels2stamp. 


Thanks for stopping by and looking:)

Saturday, November 17, 2012

Enjoy The Journey - Cricut


I hope everyone had a great week.

This is a repost of a card I did a while back. I accidentally deleted the post and needed to readd it...lol


For this card I used the Cricut Imagine and my Gypsy.

The bird is from the 3 Birds on Parade Cricut Cartridge and the layers

and all the card colors are flood fills from the Imagine Cartridge Elise.

The sentiment is also from the 3 Birds On Parade Cartridge.

The card itself is cut from the Smiley Card Cart on the gypsy.


Looking For My 700 Follower Giveaway!! Click Here!!
Looking For My Message Boards!! Click Here!!


Looking For My 700 Follower Giveaway!! Click Here!!
Looking For My Message Boards!! Click Here!!


Don't forget to subscribe by email to keep up with challenge/giveaway posts winners!

Tuesday, May 8, 2012

Krafty Girls 7 Face Off Challenge Blog Hop

I am so excited to announce that I will be a Krafty Girl for another term!

You should have arrived here from Jennifer's blog. If you just stumbled across the hop and want to start at the beginning start at the Krafty Girls blog.


This weeks challenge is to create a paper craft using a face! I had so much fun with this project.


For this card I used the Animal Kingdom Cricut Cartridge. And of course a Peachy Keen Face Stamp. The sentiment is from My Pink Stamper.

Also I have some blog candy for you all too!
All you have to do is be a follower of my blog and comment below!!! Also please consider following via Mr Linky or Blog Lovin too:)
The winner will get a $10.00 Hobby Lobby Gift Card!


Blog Hop List:

 Krafty Girls Challenge Blog
Stacey
Maribel
Karen
Jennifer
Chris ( you are here )
Cyndy
Amy


Looking For My 700 Follower Giveaway!! Click Here!!
Looking For My Message Boards!! Click Here!!


Don't forget to subscribe by email to keep up with challenge/giveaway posts winners!

Tuesday, April 24, 2012

Happy Mother's Day

Looking For My 700 Follower Giveaway!! Click Here!!
Looking For My Message Boards!! Click Here!!
Looking For Just Elements 3 Challenge!! Click Here!! ( Prize $10.00 )


Good Morning Friends!

It's time for another Krafty Girls Challenge!

Our challenge was to create a card, scrapbook layout, 3D object, or home decor project that has a Mother's Day theme. Hop on over to the Krafty Girls Blog and join in on the fun! I can not wait to see what each one of you creates!


For this card I used my cricut.
The butterfly is from Straight from the Nest.
The sentiment I printed from my computer.

Stop by  Krafty Girls Blog and join in on the fun challenge! I can not wait to see what you all come up with!

Don't forget to subscribe by email to keep up with challenge/giveaway posts winners!

Wednesday, March 28, 2012

Easter Window Card And Blog Hop Winner

Looking For My 700 Follower Giveaway!! Click Here!!
Looking For My Message Boards!! Click Here!!

Today I wanted to share a card I made following One of She's A Sassy Lady's Video Tutorials.
I honestly hardly ever touch my gypsy and it sits collecting dust because I really have no clue how to use it
and really never bothered to practice. But I am going to start! I had so much fun following along with Sheila's video that I want to give my gypsy a little more one on one time. And the fun part is she is having a challenge and you can enter what you make!

I did pretty much follow hers step by step because I am not too familiar with my gypsy yet. I am for sure going to be checking out all of her videos. TY Sheila for making this card so easy!


I also wanted to announce the winner of my blog candy for the Getting Crafty With The Cameo Blog Hop.
It was so much fun!
#23 Janeen said...
23


Cute cards, love the sentiment on the tree card! This is such a great blog hop!

I'm a new follower, cute blog! :)

majelica@comcast.net
Janeen please contact me via the contact form with your snail mail address.


Oh and I finished another blog... Please check out her blog and leave her some love!!!
http://crazyscraplady-angelpie.blogspot.com/
TY everyone!

Big Hugs

Looking For My 700 Follower Giveaway!! Click Here!!
Looking For My Message Boards!! Click Here!!

Don't forget to subscribe by email to keep up with challenge/giveaway posts winners!

Wednesday, March 14, 2012

Flower Arrangement


Good Morning Everyone!  Today is my first post for being on The Bugbytes Design Team. I was very honored when Pam asked me to join in! TY so much Pam for having me!

Today I have to share with you a cute flower arrangement I made to display on my front porch.


 I had saved some oatmeal containers because I had seen a project in a magazine for Valentine's day using them. Well I never got around to using them in February so I brainstormed another way to use them. I had been wanting to put a cute decoration on our front covered porch so I decided to use it to make it.

I covered it in paper. And filled half way with Kitty Litter.

Created my cut outs in the Cricut Craft Room.
 

The flowers were cut from the Cricut Cartridge Accent Essentials.
The Butterfly is from the digital Cricut Basics in the craft room.
Flowers cut at 3. Butterfly at 2.25.

Here is my paper button buttons I chose to use

I painted some white dowels with brown ink.


Assembled all of my pieces

I arranged each flower into the kitty litter ( holds the sticks up great ) and then filled it the rest of the way  with shredded paper. Tied ribbon and hemp around top and added butterfly.


Thank you so much for looking:) Hugs!


Looking For Krafty Girls Challenge Post!! Click Here!!
Looking For My 700 Follower Giveaway!! Click Here!!
Looking For My Message Boards!! Click Here!!


Don't forget to subscribe by email to keep up with challenge/giveaway posts winners!

Saturday, March 3, 2012

True Friend

Good Morning Everyone:)

I hope everyone is having a great day.

Today I wanted to share a quick card.


I used the Cricut Imagine Blossom Cartridge and the Cricut Cartridge Sophie.
The flower is from the Sophie Cartridge and flood filled with the Blossom Cartridge.
The half circle and stripped paper are also from the the Blossom Cartridge.
The sentiment is from My Creative Time's Many Greetings.
Stampin Up Old Olive Ribbon for the bow.


Looking For My 700 Follower Giveaway!! Click Here!!
Looking For My Message Boards!! Click Here!!


Don't forget to subscribe by email to keep up with challenge/giveaway posts winners!

Wednesday, February 29, 2012

Spring Wreath


Good Morning Everyone!

I am very honored to be guest designer today over at She's A Sassy Lady.  Thanks Sheila for having me again!


I am so ready for spring so I decided to make a springy project!


For this project I used my Cricut Imagine.
I used two cartridges. Cricut Imagine Blossom and Cricut Sophie Cartridge.

These are the supplies I used. I ended up adding a SU ribbon to the mix that isnt shown in the 
photo.


I went into cricut craft room and flood filled flowers, butterflies, and bird using the Sophie and Blossom 
cartridges. 

Assembled the items with some cute buttons. 

Wrapped the circle with the ribbon.

And then glued the flowers, butterflies, bird, and bow to the front of the wreath.


Thank you so much for looking. 


Looking For My 700 Follower Giveaway!! Click Here!!
Looking For My Message Boards!! Click Here!!


Don't forget to subscribe by email to keep up with challenge/giveaway posts winners!

Monday, February 13, 2012

Mini Valentines

Follow my blog with Bloglovin

Hey everyone! I just wanted to quickly share with you a simple valentine I threw together for my sons preschool party. I made them all the same because of time restraints.


I used the Cricut Imagine Better Together cartridge for the cute bear.
 And the Sentiment is from MY Pink Stamped.

 Did you hear that Google is pulling the plug on google friend connect for all non blogger blogs?
 If you subscribe via Google connect come March you will no longer get updates on my blog via the friend connect. I don't want to loose any of my blogger friends.

 I believe that it is mostly all non blogger users it wont work for but I am looking for alternatives to use for non blogger users and blogger users.

I found a cool site called Blog Lovin http://bloglovin.com where people can follow blogs. So if you do not use Blogger and want to continue following my blog please try following through that instead. Even if you use blogger you may like to follow blogs using this platform. It puts all blog posts in one spot for you.
Follow my blog with Bloglovin

 Or if you want please follow by email .

Or use Google reader to follow me.

 Or you can subscribe through my RSS feed ( which I will be adding a gadget for today )

 Or on Facebook... I have an account but don't use it ... now I will have to start ..lol And I will get a widget up for that over the next day or so too.

 I may do a twitter ( for those that prefer that )
I will also be adding the networked blogs gadget too. http://www.networkedblogs.com/

 I also may try the Google plus although I looked at it and it seems like a lot of work. But will look some more into it.

 I will keep everyone posted on what I found to help so we don't loose all of our blogger friends. With links to the sites so you all can add them to your blogs. Also I recommend once you have added all your gadgets send out a newsletter to all the followers on Google connect asking them to choose another method if the change will effect them. If you sign into Google connect there is an option to send out a newsletter. But before you do get all of your alternatives up on your blog so when they get the newsletter their options will already be there for them.

Looking For My 700 Follower Giveaway!! Click Here!!
Looking For My Message Boards!! Click Here!!


Don't forget to subscribe by email to keep up with challenge/giveaway posts winners!

Monday, February 6, 2012

Sending Love

Good Morning

I hope everyone is having a great day!

Today I wanted to share a cute card I did using the cricut imagine.


The images are from the Cricut Imagine Better Together Cartridge.
The sentiment is from My Pink Stamper Fabulous Phrases.


Looking For My 700 Follower Giveaway!! Click Here!!
Looking For My Message Boards!! Click Here!!


Don't forget to subscribe by email to keep up with challenge/giveaway posts winners!

Friday, January 13, 2012

Valentine's Day Gift Jar


 Good morning everyone. I hope everyone has a great day today!

 I was honored to be guest post again over at She's A Sassy Lady. Thank you Sheila for having me again this month!

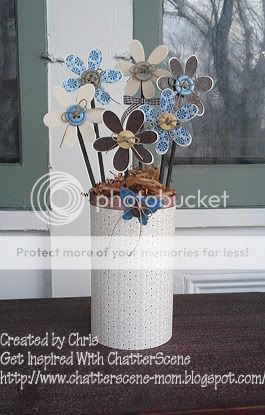
 For todays project I put together a cute little Valentine's Day jar. I had a lot of fun doing this project. 


First I started with an old peanut container. I peeled off the label and ran it through the dishwasher.


I then took some Stampin Up paper and cut it at 7x4 so it would wrap around the jar half way.


Then I opened up my Cricut Craft Room.  


The bug is from the Cricut Cartridge Simply Charmed. And the scalloped circle is 
from the Cricut Craft Room Basics digital cartridge.
The bug and its layers I cut at 3 inches. The scalloped square I cut at 3.25 inches.
I used a red ink around the scalloped square. 
And black ink and red chalk to draw in the face ( I hid the contours of the face when cutting it )


After glueing the paper to the jar I took my pink ribbon and wrapped it around
having it meet in the front of the jar. Taped it in the front and then glued the the scalloped square 
over it. I then took a couple of 3d pop dots and added the cute love bug to the front.
Took another piece of the pink  ribbon, some read thread, and a red button.
Created the bow and then glued on the side.
Then I added some glitter to his antennas and his heart. 
The lid on the jar I took off white ribbon and glued it around the jar.
And then added the finishing touch of the red thread and button to the lid.
I then added some fun Valentine's Day candy to the inside:)


Thank you so much for checking out my post here at She's A Sassy Lady.
Hugs
Chris


Looking For My 700 Follower Giveaway!! Click Here!!
Looking For My Custom Blog MakeOver Page!! Click Here!!
Looking For My Message Boards!! Click Here!!


Don't forget to subscribe by email to keep up with challenge/giveaway posts winners!

Saturday, December 10, 2011

Christmas Ornament


Happy Saturday

Today I just wanted to share quickly an ornament I did using the 3d ornaments digital from cricut.
And I wanted to share with you another completed blog:)


The ornament is from the exclusive 3d ornaments digital cartridge in the CCR.


Here is the latest blog I finished.
Stop by and give her some love:)

I actually have another to share too but she isnt debuting it until after the holidays. So I will post again once it is up on her blog:)


Ornament entered into challenge -- http://especiallymade.blogspot.com/p/weekly-challenge.html


Looking For My 500 Follower Giveaway!! Click Here!!
Looking For My Custom Blog MakeOver Page!! Click Here!!
Looking For My Message Boards!! Click Here!!


Don't forget to subscribe by email to keep up with challenge/giveaway posts winners!

Thursday, December 8, 2011

Tis The Season

Good Morning

Today I wanted to share with you all a fun Christmas Card I made using Santa's Village Cricut Imagine Cartridge. And the Cricut Craft Room Basic digital cartridge.


I am entering this card into the following challenges:

Exploring Cricut - The Challenge Was to use a Sled or a Sleigh.
Card Patterns - Sketch 144
Paper Playtime - Holiday Theme With Buttons
ScrappyMoms -- Christmas Theme
CardsTV -- say it with an S
Christmas Cards All Year Around  -- Anything Goes Christmas
Robins Creative Cottage -- Ribbons and Bows

Looking For My 500 Follower Giveaway!! Click Here!!
Looking For My Custom Blog MakeOver Page!! Click Here!!
Looking For My Message Boards!! Click Here!!


Don't forget to subscribe by email to keep up with challenge/giveaway posts winners!

Wednesday, November 30, 2011

She's A Sassy Lady Guest Designer

Good Morning Everyone:)

I was very honored to be a guest designer for Sheila at She's a Sassy Lady. Thank you Sheila for having me.
I did have another project in mind but I ordered supplies online and have yet to receive them. 

I created a card using CCR and The Snow Angel Cartridge. To see full details check out Sheila's Blog.


I have linked this card to MojoMonday!

I also created a second card and just made it slightly different than the rest!


Thank you for stopping by my blog:) Hugs.


Don't forget to subscribe by email to keep up with challenge/giveaway posts winners!

Sunday, November 20, 2011

Christmas Train Frame

Happy Sunday

I hope everyone is having a great weekend so far.

Today I wanted to share with you all a Christmas Train Picture frame:)

This project took me days to complete and I was not as happy with the end results as I had hoped to be.

I used a couple of cricut cartridges to make the project.


I used the cricut craft room to make it:)

The trains are from the B Is For Boy Cricut Cartridge. I did cut the train a bit different by using hide contour to hide some parts that I did not want on the train. And I grouped a square in three places so it would cut out a spot for the pictures.
I used cereal box in the middle and coved both the front and the back with heavy card stock.
I flood filled the train with colors from the Mr. Frosty Imagine Cricut Cartridge.

I cut the track using Cricut Pop Up Neighborhood cartridge and flood filled it with a basic black.
I cut the tracks four times and glued all four pieces together to give the tracks some dimension.

The tree is from The Give A Hoot Cricut Cartridge. Flood filled with basic colors. I also cut several layers of card stock to make the tree sturdy.
The hills in background is from the Give A Hoot Cartridge too:)

I mixed glitter and flock together and applied it on the tree, the hill, the ground, and the tracks to give it a snow like effect.

Added some embellishments and I was done.

Oh I also cut white card stock and bent it slightly on one side. Glued the hill to it and the tracks and stuff so that the frame would stand up on its own.

It was a lot of fun to try something different but I am not 100 percent pleased at how it turned out. But definitely a learning experience and I hope each time I try something different it comes out better each time.

Thank you for stopping by and taking a peek:)


Looking For My 500 Follower Giveaway!! Click Here!!
Looking For My Fall Challenge!! Click here!!
Looking For My Custom Blog MakeOver Page!! Click Here!!
Looking For My Message Boards!! Click Here!!


Don't forget to subscribe by email to keep up with challenge/giveaway posts winners!

Tuesday, November 15, 2011

Snowflake Card


Good Morning,

I hope everyone is having a good day:)

Our weather has been real crazy here. Almost 70 one day, snowing another, and 60's again this week. Crazy ..lol

Well I have finally figured out a way to balance Life, Crafting, and Blog Creating. So hopefully I will continue to be able to share more projects with you all than I have been lately.

If you have contacted me about a blog please be patient I am spending sometime today responding to emails. So hopefully we can get you on the list.

Today I wanted to share with you all a simple Snowflake card. I have to be throwing together some simple ones so I can get all of my holiday cards ready and hopefully sent out before the end of the month.


Card Recipe:

CTMH Art Philosophy Cart - Snowflake images cut at different sizes.
Sentiment - My Pink Stamper Winter Punnies
Tim Holtz Distress Ink - Tumbled Glass
CTMH Ribbon - Heavenly Blue

Also Thank you everyone fort playing in the magazine challenge. I will announce the Winner Thursday morning:)

Have a great day:)


Looking For My 500 Follower Giveaway!! Click Here!!
Looking For My Fall Challenge!! Click here!!
Looking For My Custom Blog MakeOver Page!! Click Here!!
Looking For My Message Boards!! Click Here!!
Looking For My Magazine Inspired Challenge!! Click here!!

Don't forget to subscribe by email to keep up with challenge/giveaway posts winners!
Related Posts Plugin for WordPress, Blogger...

My Etsy Shop

Please Feel Free To Share!

Contact Me

Name

Email *

Message *